Replace your top?
Think it might be a major job? It isn't all that difficult to replace the top of your car. Make sure you give yourself lots of time, a sheltered area to have the car in case it rains, and of course, some money as well.
The first thing I did was order my new top. I got mine from Rocky Mountain Motorworks, a place in Colorado that sells VW and BMW restoration parts. The tops are made by TMI, a well known and liked company that makes interior products. They have 3 different qualities available, vinyl, "cabriolet vinyl" and Stayfast canvas.
The vinyl ones were around $250 give or take, the canvas one was $390. I decided to go with the canvas, though much more costly. I wanted a top that would last a really long time and was the best quality I could find. The Stayfast canvas is a multi layer top, and it's made up of: (I'm pretty sure) canvas, rubber, and cloth. It seems to be of very good quality, TMI boasts that it's the same stuff Mercedes uses on their cars.
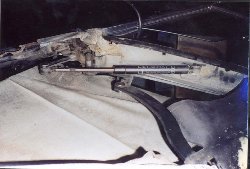
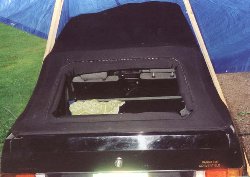
I took the car into our garage and poked around a bit. I tore off the duct tape, and looked in at what I could see. Then I tore off the outer layer of the top except the side sections. From that point all I could see is the top padding. Then I removed the padding and all the bits of the canvas that used to cover it. Under the padding is the headliner... I left the sides of the top on in order to see what the deal was with them, how they attached to the car and so-on
Then I removed the metal stripe that holds the front edge of the top to the front bow of the frame, it comes off with about 10 small phillips head screws, it also holds on the front edge of the headliner, which was glued to the front bow. From there I took to the sides, removing the excess material to really see how it was attached. I removed the rubber window-strips from the first and third sections (divided by the folds) which are the ones over the front windows and the rear edges of the back windows.
Then you need to remove the black aluminum piece the rubber parts go into. There are about 5 phillips screws for each, which go into little plastic "threads" in the roof frame. The aluminum will bend a little as you pull it off because there is a layer of double sided tape between it and the frame, easily replaced by a gasket sealer perhaps. The remains of the roof and the tape won't come off until you take out the little plastic thread pieces by gently pinching the ends from the top side of the frame and pushing them through.
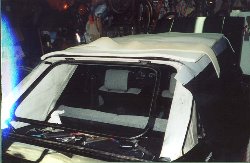
After that I tackled the rear window, which isn't hard at all so long as you have pretty strong hands and can be done alone. Get inside the car and kneel on the rear seat. Using your palm, push out an upper corner of the window, and pull the lip of the seal down close to the window with your fingertips. Pulling the seal helps the window come out, though I don't know that it's totally necessary. The window will be really difficult to push out, and you may think you are about to break it... these feelings are normal, and you must work against your brain to overcome them, but still not break the window (it shouldn't break...)
After you get the window to start to come out of it's frame, get to the outside of the car and pull the corner of the window out towards you. I worked the seal out around the top, then the side opposite the corner I was pulling on. The window won't go very far at this point, it's connected to the car Via two wires for the rear defrost. The wires are simple to unplug, but that's not all you need to do. After the wires are unplugged you must worm each connector through two small oval holes in the gasket.. then you're free.
Starting to get sick of it already? Take a break. If you're not replacing the headliner, grab some simple green or other mild cleaner and a spray bottle along with a tooth brush, and a larger nylon bristled brush and climb into the back seat. Working about a one-square-foot section at a time, spray on some cleaner, go at it with the toothbrush, then the larger brush, then wipe off the cleaner with a rag/towel/whatever, then repeat as necessary. There may be some stuff you can't get off like on mine, but don't give up early. spend a couple minutes on each section to make sure you got it really clean. I'm not sure why, but the side pieces seem to be made of a different material and didn't clean up so well, which is a little disappointing.
Take a close look at your top's frame, look for any bends or broken pieces, also look for (my personal enemy) rust. I bought some rust converter made by Plastikote, it's supposed to turn rust into a hard, not-rust chemical substance, black in color. It looks like it works.. don't know how long it will last. I'm coating it with Rustoleum as well, you aren't supposed to use it without a top coat, it's like a primer. You're going to need some adhesive for the headliner and convertible pad, I bought 3M Super Trim Adhesive, it was $13 but it's supposed to be the best stuff you can get for gluing interior stuffs.
Okay, so you've got this pad kit and you need to put it on your car. Make sure the headliner is all glued-in on the top of each bow where it's supposed to be, and on the front leading edge of the frame. I took the pad's shell and set it on top of the car with the vinyl stripes carefully placed so the deal was centered and square on the top of the car. then I stapled the rear-end of it to the bow in the back where the headliner attaches, and pulled it soso-tight (not taught) to the front bow with the top all the way up, but in a relaxed position, not locked in place. Then I got the pad and set it on there and folded the two flaps over the top and checked to make sure everything was where it is supposed to be.... you're supposed to have the vinyl over the bumpy metal things of the frame just until you get to the little plastic strips on the edges. I had the foam pad come from just in front of the rear bow to just behind of the front one, over the little clippy things.
Then I checked, double checked, tiple checked, and trimmed off the excess vinyl siding that went too far forward, and glued the bottom of the casing to the front bow. Then I got the pad all lined up and glued one end of that at a time to the bottom of the casing, focusing on the edges and where there were lumps from the bows underneath the top, and I glued the pad to the bottom of the casing, and added in a strip of the thinner pad in front of the pad so it went from front-frame, little pad, big pad so the leading edge of the top wouldn't be so lumpy when it was on. I folded the sides up to the center of the pad and glued the left side down first, then the right. Then I trimmed the excess off and stapled the rear of the pad to the rear bow where the headliner attaches.
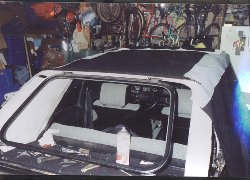
Then comes the top... while it was off the car I threaded in the side tension cables using the pieces of string that were inside the top for this purpose. Then I threw the top on and got it all lined up to see what there was to work with. I found out that when the piping was sewn in, there was about 2" leftover material on the inside of the top which wasn't going to allow me to fir the material into the channel all the way, so I cut it off about 1/4" from the stitch. The first thing you need to do is get it centered along the rear channel where it attaches to the body of the car. I threaded the rear cable through the two holes on the sides of the top where it goes from being outside of the top to inside of the top, then I attached each cable end to it's anchor as loose as it could be. I started to stuff the top into the channel starting from the center, going right, then the center going left. I started with the cable just at the stitch where the piping is, and pushed it in using a half of a wooden clothes pin. Then I went around again this time using a hammer to make sure it went up into the channel real far. I tightened up the cables a bit and tapped them into place some more, and tightened them up some more. I had problems with the cable spinning while I tried to tighten the nut, so I just used a screwdriver and I pried against the cable-end's non-threaded part and held it against the anchor to keep it from turning. I had trouble with the top coming out of the channel, come to find out that the channel was too large to hold in the material the way it was supposed to be so I used a rubber mallet and carefully closed up the channel onto the top and cable, which effectively locked it in place, and gave it a finished look
After the rear cable was all set I opened up the frame and put the front of it into the pocket of the top and closed it to see how the rear cable was and how things were going. You need to glue the top to the rear window frame, but make sure you pull it to the inside enough so that when there is tension on the top the little bead doesn't roll back behind the frame and look unfinished. Then I attached the little plastic covers on the sides where the top ends in the back. You need to trim off some of the material and piping to fit it correctly. Then I used some weather-strip and put that on the aluminum seal holder for the rear window rear seal, and after cutting holes through the glued-on top, fit in the little plastic screw thingers and attached the aluminum piece with screws. Then I added all the other aluminum pieces I had to remove to get all of the old top off. I noticed that this top didn't fit like the original one did, which is a bummer, but makes things much simpler.
After all the seal frames where in place I got some silicone (the lube) and lubed up the rubber seals and slid them in. I'm sure it's impossible to install them without it. Then I took the front of the top and screwed it in place where it's supposed to go using the long aluminum strip and two side strips, again making sure it was pulled in far enough so that when it's closed the piping on the front lip doesn't curl back past where it's supposed to be. Then comes the hardest part.
Installing the rear window... I made a big mistake doing this part, so I can't quite tell you the right way to do it, but I know what I did wrong and what I should have done so I'll tell you that. CLOSE THE TOP! this is what I did wrong, when I installed my rear window the top was not latched down and open about 6", and after I got the window in the top wouldn't close! Turns out the window is pulled up when the top is closed, and when I had installed the rear window I pulled the material tight all the way around it, and the little bit of material between the window and the rear of the car was so tight it wouldn't allow the window to move up at all. The window frame has two straps that go to the middle bow which pull it up. the middle bow was pulling against the straps, the straps were pulling against the window frame, the window frame was held in place by the material at the base of it, so the top wouldn't close! I ended up disconnecting the straps for the window, it was that or buy another top and install the window correctly. It seems to be working out okay so far. 8 months later it is still closes fine, and no problems resulting.
Okay, so you close the top and then cut out a square about 4" away from the window frame, then staple the top to the frame (takes a real good stapler) pulling it so it's firm and nice and there aren't any wrinkles. The hardest part is getting the staples to go into the frame, and making sure that there arn't any wrinkles around the corners. Don't worry though, you can always pull the staples out and try again. I ended up pulling out about 30. I used the staples one after another with maybe 1/8" between them, and did one staggered above /below the other around the corners to make sure it wasn't going to go anywhere. Then I trimmed off the excess, and got the window seal all on the window and threaded in the window defrost wires and called upon my little sister for assistance. I wrapped a piece of small nylon rope around the window twice (I had about 22ft) and starting in the right upper corner, worked the inner edge of the seal into the frame by having me push in from the outside, and having my sister pull gently on the string from inside. When we got to the left upper corner after having gone almost all the way around already, the window glass it's self wasn't all the way in where it was supposed to be, and this took some coaxing via the palm of my hand while my sister held the frame in place to oppose the force. It did take a second time around with the string to make sure the seal was where it was supposed to be, that's why you wind it around the window twice.
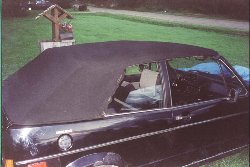
Now, it wasn't so simple.. took about 45min to do. I had a major problem though, the string had gotten tangled up with the defrost wires and I ended up having to pull them out of the seal.. this tore them up quite a bit. If I were to do it again I would just leave them out and forget about hiding them in the seal. I greased up my latch points because the top was still quite difficult to close even though the window straps where disconnected, it isn't the way it really should be but it works and it doesn't leak and it 's cost more than the car did, so I guess it's good enough.
Hey, I've had the top on since June 20th 1999 or something like that, and it is now November 7th 2000. I have been sending people to this page for a while, usually via the cabriolet and cabrio club. I wanted to post that the top is doing well, it has travelled around 11,000 miles on my car so far. There are a couple things I noticed in retrospect that I would like to add. The clips that hold on the ends of the seals are plastic, not aluminum. They slide off the end I believe. When you install the front lip of the top, be sure you do it real evenly. Try to get it so the bead is slightly pointing down so when the top closes and the material pulls back, it points straight. Also, where the top attaches to the frame which is the the back part of the side window frame area, pull the top in tight when you glue it on, have the bead a little more than slightly pointing in. Be extra sure to get the lower edge tight, otherwise it forms a slack arear right infront of where the cable goes into the inside of the car because this forms a small open space (half size of your pinkey) when closed and a little water gets in there when it rains or when you wash it. Do this evenly too, for when you close the top the material tries to pull back and it makes the lip point outwards a little, and forms an unattractive area where the top material goes under the seal piece because you can see it, but would not be able to if you had pulled the material tighter so the bead was "in" more. Understand? By the way... these ideas are in theory. They are things I don't really like about my top. I am pretty obsessive over little details like that, the average person probably doesn't notice it, or wouldn't unless you pointed it out. I would like to be able to do another one sometime, just to get it perfect. Still not a bad job for someone 18 years of age who has never done it before, and had almost no instructions on how to do it.
I also ordered a new convertible pad, which will need to be replaced if you're looking to replace your top. The old pads really fall apart and can smell... from RMM mine was almost $100, it comes in a kit and you need to put it all together yourself. Now's the time to think about doing your headliner as well, though I decided not to do mine since it wasn't ripped but in one small section, and not too too dirty. I guess headliners cost around $100. You will need to replace your top cables when you do the top, there are 3 tension cables that hold the top tight when it's up. One goes across the back, and one along each side.
You need to be careful doing this though, the front rubber is head in by a small phillips at one end, and a little clippy thing at the other end. The little clippy thing on the driver's side broke because I pulled away from the bar as I was trying to slide the rubber away from the clip.. no big deal, I can glue it later. It's a bummer though. The rear rubber is held in by a clippy thing at each end. At first I tried to bend one out and then slide the rubber away from the other end, but it broke. Then I decided to go at the rubber from the middle and pull both ends towards the center as I pulled it away, saved the clippy things on that one.